
No matter what kind of business you operate, having a logo is an absolute necessity. A good logo will not only be eye-catching and help to make your business look more professional; it can also be used in all of your promotional material to tie together your various products and services and generally to create more of a consistent image for your organization.
One great example of using logos to promote a business of course is to add them to promotional gifts like t-shirts, mugs and other items.
In order to use logos in a range of different situations though, you also need to know how to create high definition images that will work in this capacity and you need to know how to come up with a stunning and versatile design. Read on and we'll look at some tips that will help you to do just that and get a highly professional looking rendition of your logo for your business.
An Introduction to Vector Files
The first thing you should learn before setting out to create your own logos is what a vector file is and how you can create them.
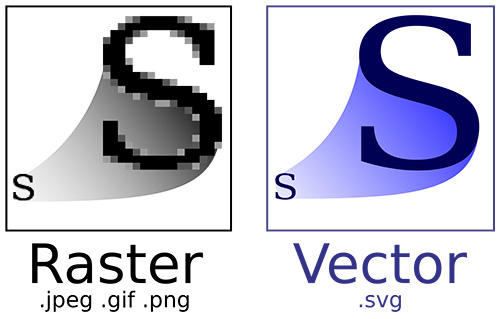
Unbeknownst to many designers, JPGs, PNGs and BMPs all fall into one category of file – 'raster files'. Raster files essentially work like maps, which tell browsers and other rendering software the coordinates for each pixel. While this can be effective, it also means that the files will have a set resolution and that they will look grainy if you zoom in. At the same time, it makes the images much harder to edit, as you have to 'repaint' each pixel individually.
Vector files on the other hand are creating with software like Adobe Illustrator and these work as instructions. These instructions essentially provide directions that tell the computer where to draw the line, what angle to change at, how thick the 'ink' should be, etc. You can thus zoom in to any level with these kinds of files without losing any quality because it's simply a matter of scaling up the instructions.
If you use a professional designer, they should give you a vector file so that you can zoom in on your logo, zoom out or make changes. Likewise, if you create your own logo, you should do so with Illustrator rather than PhotoShop. This is very important but even a lot of designers don't know the difference – make sure to always ask!
With a vector file, you'll then be able to easily change the size of the image, to change the color, or to alter the angles – with just a single click. This way, you can make sure that the logo will be the perfect fit for your custom jackets your website, or wherever you are using it at this stage.
Oh and to make life even easier, Entripy will convert your raster files into vector images for you! This way you can create your design while playing around in MSPaint or PhotoShop and then let us worry about formatting it to be high definition and editable!
Converting Your Logo
If you already have a logo but it's a grainy PNG, then you can change this relatively easily. All you need to do is to load it into Illustrator or another piece of vector software and then 'trace' over the lines. Alternatively, Entripy offers to convert your logo or design to its’ rightful file with no artwork fees.


